GPS-слежение за автомобилем с LtAP MikroTik

MikroTik's LtAP is a great solution for vehicle connectivity over LTE and offers dual SIM capabilities for network redundancy. It has an integrated 2.4Ghz 802.11n radio perfect for a small mobile hotspot as well as GPS for vehicle tracking. We have always loved the idea of being able to provide basic internet services to our own company vehicles as well as being able to track them with one device and this is how we did it.
Hardware Preparation
We needed to install an external GPS antenna on the LtAP which requires drilling a small hole and fitting a UFL-SMA Female connector. It is very important to make sure the UFL connector is secure and the external antenna is connected before powering up the LtAP. Not doing so could damage the GPS radio.
Router Configuration
Once everything was re-assembled, we upgraded to the latest version of RouterOS before configuring the GPS. This requires the use of the serial interface which isn’t used for GPS by default, so you will need to disable the serial's default use via the console menu first./system console<br>set [ find ] disabled=yes
Next up was the GPS configuration where we make use of "serial0" as our default port. It's important to correctly set the Coordinate Format to "dd" as this is vital for communication and mapping to our tracking server later on. If configured correctly and you are not getting coordinates, make sure your GPS antenna is positioned either outside or near a window to connect to those satellites./system gps<br>set coordinate-format=dd enabled=yes gps-antenna-select=external port=serial0 \<br>set-system-time=no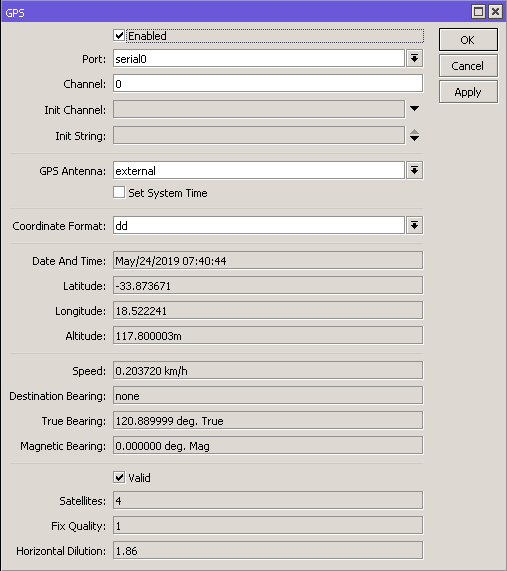
You could use the default configuration as a plug and play solution for internet connectivity or customise it your way. The GPS data collected by the router can now be posted across the web to our own private server which can be done either by HTTP, HTTPS or VPN. We have created a guide and shared our web server code on GitHUB to assist you
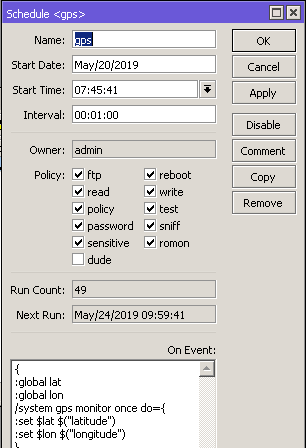
Once your server is working you can start posting GPS co-ordinates by using a script in conjunction with the scheduler to your server address. We used HTTPS and decided to set ours to 1-minute intervals.